
Your “core” is made up of a group of important muscles that work together to keep your spine stable. Having a strong, healthy core is essential not only for athletes, but for people of all ages, shapes and sizes. A core that is solid in both strength and endurance is extremely important base for allowing you to move your hips, legs and arms with ease and proper mechanics in order to avoid pain and injury!
Your core is made up of a number of important structures (muscles, tendons, ligaments, bones, fascia), and includes the following muscles: rectus abdominis internal and external obliques, transversus abdominis, quadratus lumborum, psoas, multifidus, paraspinal extensors and your gluteals.
When exercising your core, your goal shouldn’t be to simply to build a “6-pack,” but instead to improve your core endurance strength. Being able to maintain a stable and neutral spine throughout your activities of daily living is essential for withstanding the stresses and strains you put on your body on a daily basis. Whether it be a sporting activity, an unexpected injury or car accident, house chores, bending over to pick up / play with your children, or simply sitting at your desk, your core must be able to hold up to many expected and unexpected challenges, no matter how big or small – agreed?
It is important to choose core exercises that provide benefit without putting unnecessary stress and strain through the structures of our low backs (our vertebrae, intervertebral discs, muscles, ligaments, tendons).
Here are 3 exercises for the core developed by the world-renowned, spine expert, Dr. Stuart McGill, that will increase your core endurance and spine health, all in a safe and very effective way:
-
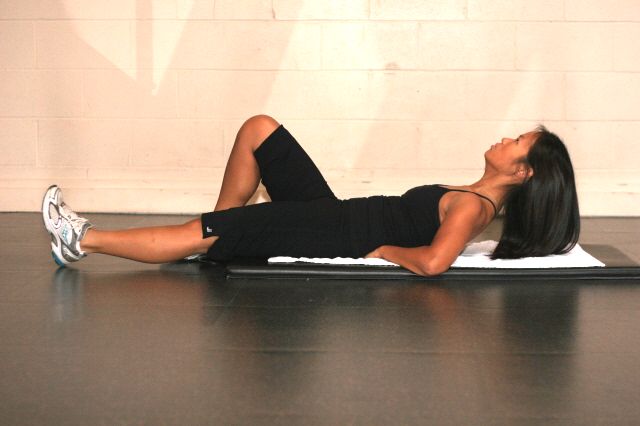
Modified Curl-Up
A) Beginner’s curl-up:
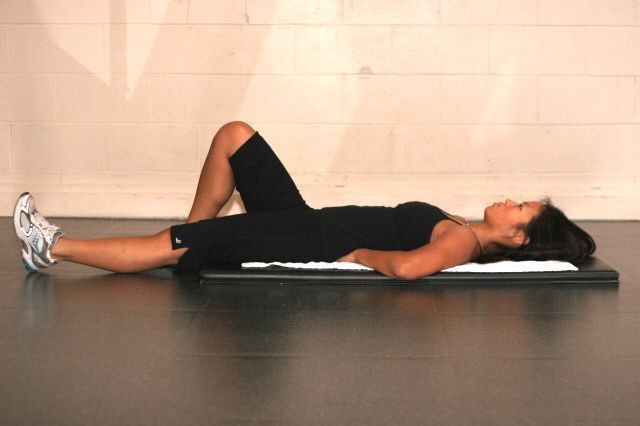
- Lay on your back with one knee bent to 90 degrees while keeping your other leg relaxed on the floor. Place your hands underneath the arch of your spine, supporting your low back. Ensure that this arch is maintained throughout the curl-up.
- This position ensures your pelvis stays in a neutral position that the muscles of your core are in optimal alignment to avoid strain on your low back.
- Start by bracing your abdomen (bearing down and contracting through your belly).
- Next, picture your head and neck as a rigid, single unit block cemented together, locked onto your upper back and not able to move independently. Pick a spot on the ceiling above and focus your gaze there, while lifting your shoulder blades about 30 degrees off the floor and slowly returning to your starting position. Make sure your chin is not jutting forward and that you are not leading with your neck while performing this exercise. A great cue to ensure your neck is in a stable position is to “give yourself a double chin,” while pressing your tongue upward on the roof of your mouth behind your front teeth, to promote stabilizing neck muscle patterns.
- Perform 3 sets of 10-12 reps.
B) Intermediate curl-up:
- The intermediate progression of the curl-up is to raise your elbows a few centimetres so that your arms do not pry your shoulders up, thus shifting more load to your rectus abdominis muscles.
- Do not raise your head up any higher than in the beginner’s curl-up.
- Perform 3 sets of 10-12 reps.
- This exercise activates your rectus abdominis and your obliques without producing spinal motion, reducing harmful compressive loads on the intervertebral discs and other structures in your back.
-
Side Bridge
A) Beginner’s sidebridge from your knees:
- Lay on your side, supported by your elbow and your hip.
- Bend both of your knees to 90 degrees, keeping your knees stacked one on top of the other.
- Make sure your elbow is positioned directly under your shoulder to avoid unnecessary strain through your shoulder joint. Place your free (non-supportive) hand on your opposite shoulder and pull down gently to add additional stability to your shoulder.
- While maintaining a neutral spine and abdominal brace, squeeze your glutes and lift your hips up off the ground and straighten your torso until your body is supported on your elbow and knee, with some input from your lower leg.
- Hold for 8-10 seconds, repeat 3 times. Increase time as tolerated.
B) Intermediate sidebridge from your feet:
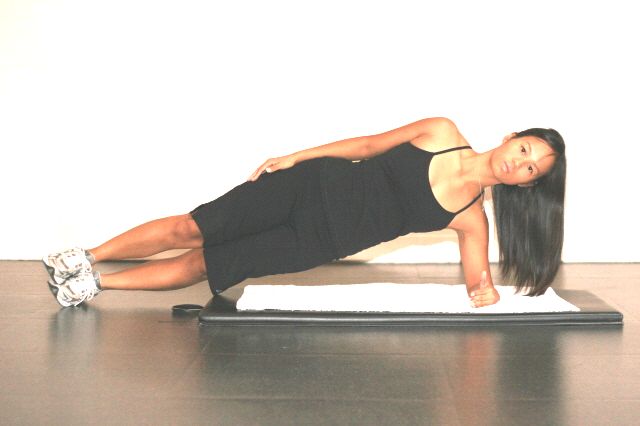
- The starting position for the intermediate sidebridge is similar to that for the beginner, except that your knees are straight with legs extended so they are inline with your body.
- While maintaining a neutral spine and abdominal brace, squeeze your glutes and lift your hips up off the ground and straighten your torso until your body is supported on your elbow and feet.
- Hold for 8-10 seconds, repeat 3 times. Increase time as tolerated.
- This exercise targets your quadradus lumborum and obliques nicely!
-
Bird Dog (aka: Cross-Crawl)
- This exercise trains your extensor muscles, even though your abdominals are consciously activated to control and maintain your neutral spine position.
- Good form includes a neutral spine and abdominal bracing with no spine motion at all times.
A) Beginner’s bird dog:
- The starting position is on your hands and knees with your hands positioned directly under your shoulders and your knees directly under your hips.
- Keeping your spine neutral, core activated and tight at all times, try the following beginner’s progressions:
- Simply lifting a hand or knee about an inch off the floor
- Raising one leg or one arm at a time
- Perform 3 sets of 8 – 10 reps. Start by holding each position above for one breath; progress to holding each position for 6 – 8 seconds, as tolerated.
B) Intermediate bird dog:
- Same set up as beginner’s bird dog
- Keeping your core activated and tight at all times, perform the following intermediate progressions:
- Raising you opposite hand and knee simultaneously
- Raising your opposite hand and leg simultaneously, keeping your limbs parallel to the floor.
- Perform 3 sets of 8 – 10 reps. Start by holding each position above for one breath; progress to holding each position for 6 – 8 seconds, as tolerated.
Stay tuned for our future blog posts from our team at Athlete’s Care, on exercise progressions to further challenge your core – in a safe and effective way! Author: Dr. Katie Au, B.Sc. Kin (Hons), D.C., D.Ac, CSCS, FCCRS©, ART®, GT®

Dr. Katie Au is an experienced Chiropractor, Acupuncture Practitioner and Certified Strength and Conditioning Specialist. Find out more about Katie here
Click the link below to request an appointment with a Chiropractor at Athlete's Care.
Request an Appointment Today!

